Esports has outgrown local tournaments and now runs on global platforms linking millions of players and fans, powered by
immersive esports technology
. Communities form around games, teams, and streamers, blending competition, entertainment, and social connection. At this scale, reliability and low latency are non-negotiable to keep matches fair and audiences engaged during spikes.
High-speed networks, cloud rendering, modern graphics, and streaming make worldwide play possible, while data and AI sharpen strategy. Crucially, infrastructure must scale horizontally across regions, cache at the edge, and expand automatically under load so performance stays consistent.
This article maps the technologies behind modern esports and the design choices that keep them resilient at scale, so the experience feels instant from first click to final play.
The Global Picture
Let’s start with the big picture and why esports now feels like a shared live moment wherever you are.
You may have watched a finals stream with friends or shared a highlight in chat. That everyday moment sits on top of a vast market and audience.
The market has expanded at a 20.9% rate in recent years.
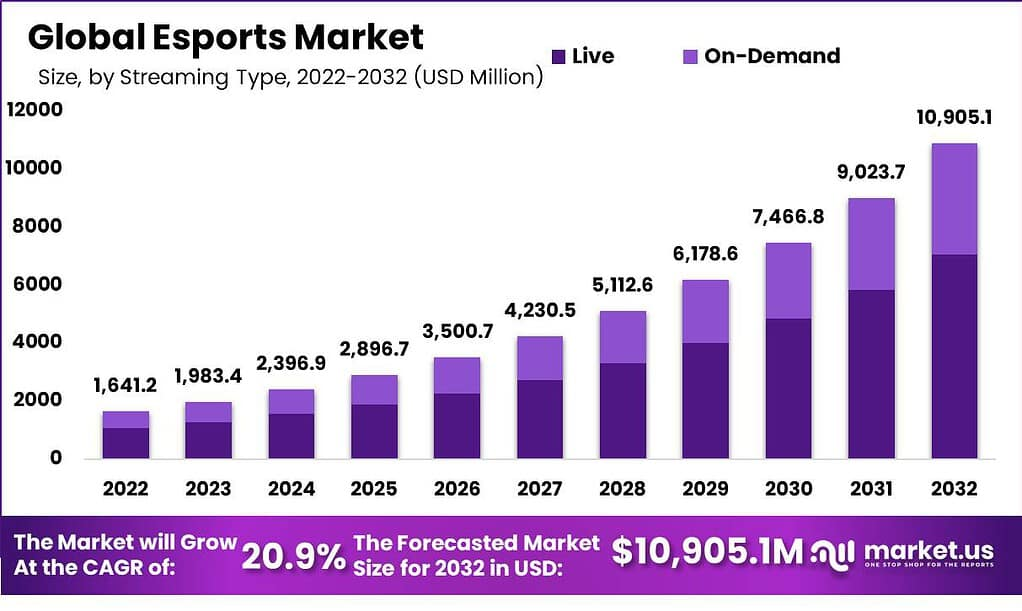
Source: Scoop Market
The global esports audience surpassed
500 million viewers in 2020
. Industry revenue reached around
USD 2.0 billion in 2023
and is projected to grow to USD 5.5 billion by 2029. Longer-term forecasts suggest a compound annual growth rate of nearly 21%, with revenues expected to reach
USD 10.9 billion by 2032
.
Esports is digital-first, so fans join live from different regions at the same time. That reach shapes every technical choice.
Platforms and Real-Time Infrastructure
Fans expect more than a broadcast. They want to react, interact, and feel part of the match. Meeting that expectation means processing actions and reflecting results in milliseconds: bets settle as they happen, moves register for every client at once, and streams stay in step with in-game events.
Behind the scenes, persistent connections keep two-way communication open. Load balancers and game servers handle traffic and core logic. Event-driven patterns broadcast only what each user needs. Caching and in-memory stores such as Redis answer hot reads quickly. Content delivery networks ( CDNs) and edge locations reduce round-trip time for global audiences. These are the building blocks of
immersive esports technology
, and they exist to keep the experience responsive when traffic surges.
Speed protects immersion and trust. A delay during a clutch play or a live bet breaks both. Real-time platforms enable instant feedback, live chat, synced multiplayer, and up-to-the-second odds. Operators benefit as well: live data supports fraud checks, personalised offers, dynamic pricing, and timely promotions. The result is higher retention and fairer play.
AI and Data: From Play to Shared Insight
This is where raw play turns into insight that helps players, teams, and viewers get smarter together.
Artificial intelligence (AI) now supports training, planning, and engagement across the community. Teams review footage with machine learning, spot errors, and test scenarios before match day. Virtual assistants help track progress and suggest adjustments.
Matchmaking pairs players of similar skill so every game feels balanced, while anti-cheat tools monitor play in real time and respond within seconds. For viewers, AI compiles highlights, personalises feeds, and surfaces stats that spark discussion. AI does not replace the human side of esports. It amplifies it by making fair play easier to maintain and shared learning easier to access.
The Future of Immersive Esports: AR, VR, and Cloud Integration
Next, we look at how new realities and cloud power will make watching and playing feel more present.
Esports is moving toward presence, not just pixels. The next wave blends virtual reality (VR), augmented reality (AR), and cloud, so players and fans feel inside the match while platforms hold steady under load.
At a basic level, cloud rendering sends high-quality visuals from powerful servers straight to headsets and phones, so devices do less work and the action feels smooth. Nearby servers cut the time between your input and what you see, which means steadier aim, smoother movement and viewers who stay in sync with the match.
On the viewing side, augmented reality (AR) adds simple overlays like live stats, heatmaps and quick point-of-view switches for watch parties. Fans can pin tactics on screen and share clips that include useful context, not just the video. For collaboration, social virtual reality (VR) creates shared rooms where teams review rounds together, coaches sketch ideas in space, and gentle haptic cues help with timing. Early brain-computer interface (BCI) research is already improving training and accessibility, with competitive use further out.
Operationally, security and identity are handled in the cloud. Anti-cheat updates roll out quickly, and your profile and items travel with you across devices. Better compatibility between platforms helps communities stay together wherever they log in.
Cloud rendering, AR, and VR stitched to edge-first delivery keep the play responsive and viewing in sync at any scale. The technology fades into the background, matches feel immediate, spectators feel present, and communities stay connected long after the final round.
Scalability in Esports Platforms
All of this only works at scale, so these are the principles that keep things smooth when the crowd shows up.
Immersive features raise the bar. AR, VR, and cloud expand access, lengthen sessions, and multiply real-time events. To keep the experience smooth, platforms must scale from the first click to the final play.
Design principles
Scale out horizontally rather than relying on larger single servers. Hold latency steady as traffic rises. Use distributed services that add capacity on demand. Place compute at the edge to shorten round-trip times for inputs, tracking, and streams. Move events through queues and pub/sub so spikes do not reach clients. Share hot data. Cache reads close to players. Isolate failure with circuit breakers and graceful fallbacks.
Consistent experience under load
Keep match starts fast, frame timing stable, chat responsive, and spectating in sync during peak traffic. Run multi-region deployments with smart routing so performance feels similar across continents. Maintain identities, inventories, and anti-cheat on the server and keep them in sync across devices.
Operate by signals
Define SLOs for latency and availability. Instrument everything. Auto-scale from real usage, not guesses. Use rolling updates, redundancy, and automatic failover to stay always on. Control cost with elastic capacity that expands for events and contracts afterwards. This is where
immersive esports technology
proves its value, turning peak moments into reliable moments.
Proof in production
Scalability is the test that decides whether real-time features, AI-driven insights, and AR/VR hold up. Peak moments create sudden spikes in concurrent users, messages, and state updates. A scalable platform keeps latency steady, expands capacity on signal, and degrades gracefully if a region falters.
FACEIT shows what this looks like in practice. Working with
Erlang Solutions
, the team upgraded MongooseIM and Erlang, redesigned presence at scale, and tightened deploys. The result was a two-times speed increase and stable support for up to 250,000 users with lower maintenance. Crucially, presence and chat stayed responsive during surges, which is the hallmark of a platform built to scale rather than cope.
In the end, scaling well turns pressure into proof. When capacity grows on signal and services degrade gracefully, peak moments feel natural, competition stays fair, and communities keep turning up. That is how the tech steps back and the match takes centre stage.
To conclude
Esports thrives when technology fades into the background and the community takes centre stage. Real-time services keep playing responsively. AI and analytics turn activity into shared insight. AR, VR, and cloud widen access. Scalability makes peak moments feel natural. If you are building or scaling an esports platform, design for low latency and resilience from day one. We design real-time systems that keep matches responsive and communities connected, so
get in touch
.
The post
Immersive Esports: The Technology Behind Competitive Gaming
appeared first on
Erlang Solutions
.