
-
Pl
chevron_right
Erlang Solutions: You’ve been curious about LiveView, but you haven’t gotten into it
news.movim.eu / PlanetJabber • 6 April 2023 • 21 minutes
As a backend developer, I’ve spent most of my programming career away from frontend development. Whether it’s React/Elm for the web or Swift/Kotlin for mobile, these are fields of knowledge that fall outside of what I usually work with.
Nonetheless, I always wanted to have a tool at my disposal for building rich frontends. While the web seemed like the platform with the lowest bar of entry for this, the size of the Javascript ecosystem had become so vast that familiarizing oneself with it was no small task.
This is why I got very excited when Chris McCord first showed LiveView to the world. Building interactive frontends, with no Javascript required? This sounded like it was made for all of us Elixir backend developers that were “frontend curious”.
However, if you haven’t already jumped into it, you might be hesitant to start. After all: it’s often not just about learning LiveView as if you were writing a greenfield project, but about how you would add LiveView into that Phoenix app that you’re already working on.
Therefore, throughout this guide, I’ll presume that you already have an existing project that you wish to integrate LiveView into. If you have the luxury of a clean slate, then other resources (such as the Programming Phoenix LiveView book, by Bruce A. Tate and Sophie DeBenedetto ) may be of more use.
I hope that this article may serve you well as a starting point!
Will it work for my use case?
You might have some worries about whether LiveView is a technology that you can introduce to your application. After all: no team likes to adopt a technology that they later figure out does not suit their use case.
There are some properties of LiveView which are inherent to the technology, and therefore must be considered:
Offline mode
The biggest question is whether you need an offline mode for your application. My guess is that you probably do not need it , but if you do, LiveView is not the technology for you. The reason for this is that LiveView is rendered on the backend , necessitating communication with it.
Latency
The second biggest question: do you expect the latency from your clients to the server to be high , and would it being high be a serious detriment to your application?
As Chris McCord put it in his announcement blog post on the Dockyard blog :
“Certain use cases and experiences demand zero-latency, as well as offline capabilities. This is where Javascript frameworks like React, Ember, etc., shine.”
Almost every interaction with a LiveView interface will send a request to the server; while requests will have highly optimized payloads, if you expect the average round trip from client to server to be too many milliseconds, then the user experience will suffer. LiveView ships with tools for testing your application with increased latency, but if you already know that there’s a certain latency maximum that your clients must not but very likely would exceed, then LiveView may not be suitable.
If these are not of concern to your use case, then let’s get going!
What does it take for me to start?
Phoenix setup
First of all, you’ll want to have a recent version of Phoenix, and your code up-to-date. Following are upgrade guides for older projects:
- Phoenix 1.4.x to 1.5.0 upgrade instructions
- Phoenix 1.5.x to 1.6.0 upgrade instructions In the latter of the two guides, there’s an optional step to change the templates to HEEx. It is highly recommended to do this as well . Here’s the relevant section: Move to HEEx .
LiveView setup
The next step is to install LiveView into your existing project. The LiveView documentation has a great section on the subject: Installing LiveView into an existing project .
The guide is rather straight-forward, so I will not reiterate its contents here. The only comment I’ll add is that the section at the very end about adding a topbar is (as the documentation points out) optional. It should be said, however, that this is added by default in new LiveView projects, so if you want to have a setup that’s as close to a freshly generated project, you should include this.
At this point, you should have everything ready for introducing your own LiveView code!
Quick LiveView overview
Before we get to the actual coding, let’s get at a quick overview of the life cycle of a LiveView page. Here’s a high-level overview:
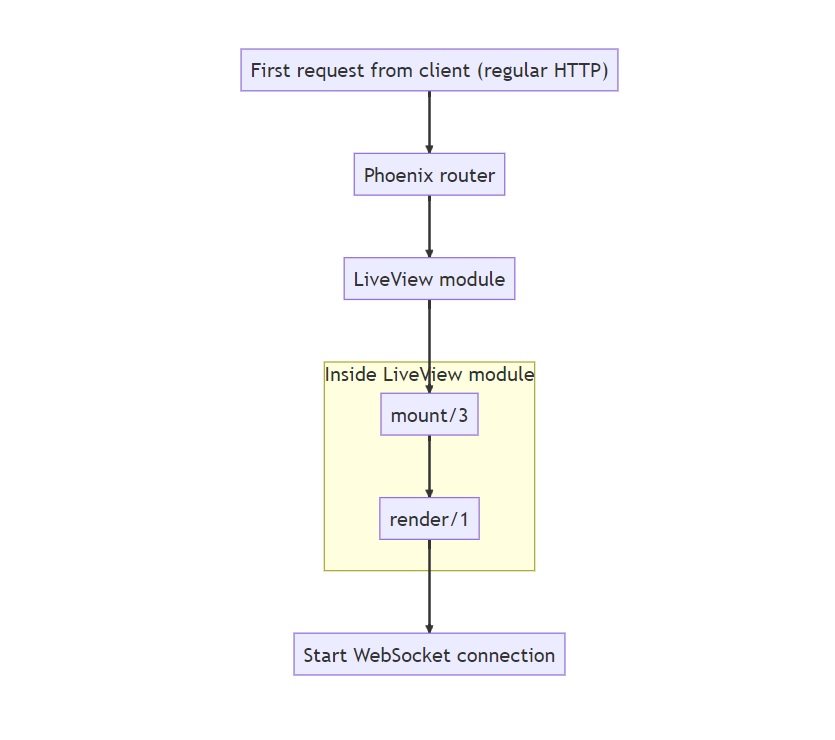
The first request made to a LiveView route will be a plain HTTP request. The router will invoke a LiveView module, which calls the mount/3 function and then the render/1 function. This will render a static page (SEO-friendly out-of-the-box, by the way!), with the required Javascript for LiveView to work. The page then opens a WebSocket connection between the client and the server.
After the WebSocket connection has been established, we get into the LiveView life cycle:
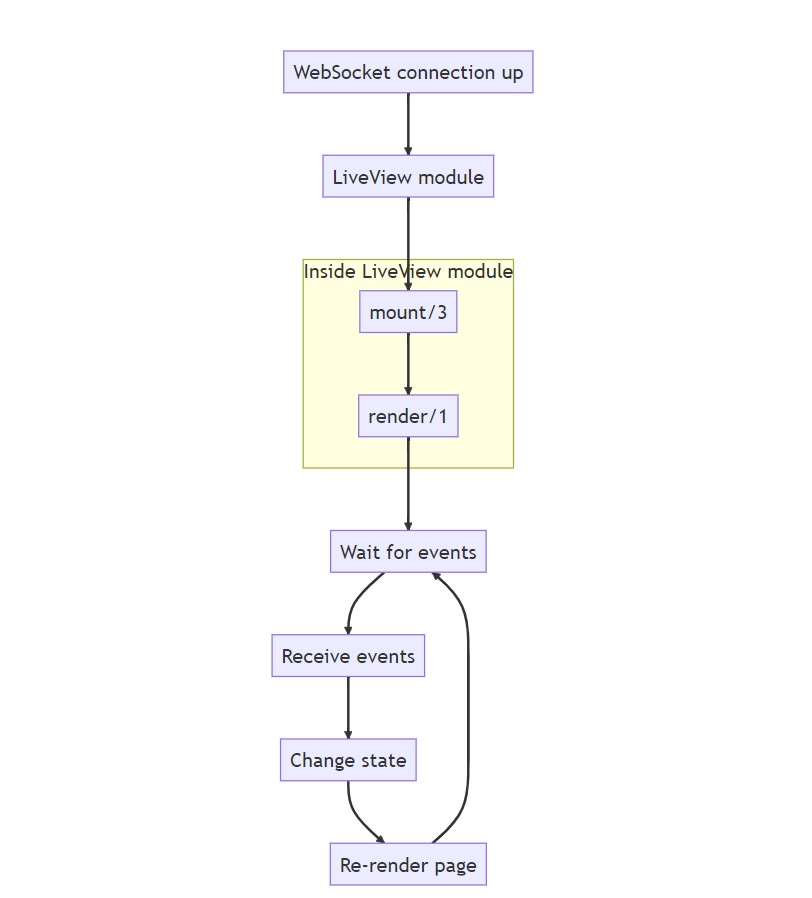
Note that mount/3 and render/1 will be called again, this time over the WebSocket connection. While this probably will not be something you need to worry about when writing your first LiveView pages, it might be of relevance to know that this is the case ( discussion about this can be read here ). If you have a very expensive function call to make, and you only want to do it once, consider using the connected?/1 function.
After render/1 has been called a second time, we get into the LiveView loop: wait for events, send the events over the wire, change the state on the server, then send back the minimal required data for updating the page on the client.
Let’s now see how we’ll need to change your code to get to this LiveView flow.
Making things live
Now you might be asking:
“OK, so the basics have been set up. What are the bare minimum things to get a page to be live?”
You’ll need to do the following things:
- Convert an existing route to a live one
- Convert the controller module into a live module
- Modify the templates
- Introduce liveness
Let’s go over them, one by one:
Bringing life to the dead
Here’s a question I once had, that you might be wondering:
If I’ve got a regular (“dead”) Phoenix route, can I just add something live to a portion of the page, on the existing “dead” route?
Considering how LiveView works, I’d like to transform the question into two new (slightly different) questions:
- Can one preserve the current routes and controllers, having them execute live code?
- Can one express the live interactions in the dead controllers?
The answer to the first question: yes, but generally you won’t . You won’t, because of the answer to the second question: no , you’ll need separate live modules to express the live interactions.
This leads to an important point:
If you want some part of a page to be live, then your whole page has to be live.
Technically , you can have the route be something else than live (e.g. a get route), and you would then use Phoenix.LiveView.Controller.live_render/3 in a “dead” controller function to render a LiveView module. This does still mean, however, that the page (the logic and templates) will be defined by the live module. You’re not “adding something live to a portion of the dead page”, but rather delegating to a live module from a dead route; you’ll still have to migrate the logic and templates to the live module.
Therefore, your live code will be in LiveView modules (instead of your current controller modules ), invoked by live routes. As a sidenote: while it’s not covered by this article, you’ll eventually group live routes with live_session/3 , enabling redirects between routes without full page reloads.
Introducing a live route
Many tutorials and videos about LiveView use the example of programming a continuously updating rendering of a thermostat. Let’s therefore presume that you’ve got a home automation application, and up until now you had to go to /thermostats and refresh the page to get the latest data.
The router.ex might look something like this:
defmodule HomeAutomationWeb.Router do
  use HomeAutomationWeb, :router

  pipeline :browser do
    # ...
  end

  pipeline :logged_in do
    # ...
  end

  scope "/", HomeAutomationWeb do
    pipe_through [:browser, :logged_in]

    # ...

    resources "/thermostats", ThermostatController
    post "/thermostats/reboot", ThermostatController, :reboot
  end
end
This is a rather simple router (with some lines removed for brevity), but you can probably figure out how this compares to your code. We’re using a call to Phoenix.Router.resources/2 here to cover a standard set of CRUD actions; your set of actions could be different.
Let’s introduce the following route after the post-route:
live "/live/thermostats", ThermostatLive
The ThermostatLive will be the module to which we’ll be migrating logic from ThermostatController.
Creating a live module to migrate to
Creating a skeleton
Let’s start by creating a directory for LiveView modules, then create an empty thermostat_live.ex in that directory.
$ mkdir lib/home_automation_web/live
$ touch lib/home_automation_web/live/thermostat_live.ex
It might seem a bit strange to create a dedicated directory for the live modules, considering that the dead parts of your application already have controller/template/view directories. This convention, however, allows one to make use of the following feature from the Phoenix.LiveView.render/1 callback (slight changes by me, for readability):
If you don’t define [render/1 in your LiveView module], LiveView will attempt to render a template in the same directory as your LiveView. For example, if you have a LiveView named MyApp.MyCustomView inside lib/my_app/live_views/my_custom_view.ex, Phoenix will look for a template at lib/my_app/live_views/my_custom_view.html.heex.
This means that it’s common for LiveView projects to have a live directory with file pairs, such as foobar.ex and foobar.html.heex, i.e. module and corresponding template. Whether you inline your template in the render/1 function or put it in a dedicated file is up to you.
Open the lib/home_automation_web/live/thermostat_live.ex file, and add the following skeleton of the ThermostatLive module:
defmodule HomeAutomationWeb.ThermostatLive do
  use HomeAutomationWeb, :live_view

  def mount(_params, _session, socket) do
    {:ok, socket}
  end

  def render(assigns) do
    ~H"""
    <div id="thermostats">
      <p>Thermostats</p>
    </div>
    """
  end
end
There are two mandatory callbacks in a LiveView module: mount/3, and render/1. As mentioned earlier, you can leave out render/1 if you have a template file with the right file name. You can also leave out the mount/3, but that would mean that you neither want to set any state, nor do any work on mount, which is unlikely.
Migrating mount logic
Let’s now look at our imagined HomeAutomationWeb.ThermostatController, to see what we’ll be transferring over to ThermostatLive:
defmodule HomeAutomationWeb.ThermostatController do
  use HomeAutomationWeb, :controller

  alias HomeAutomation.Thermostat

  def index(conn, _params) do
    thermostats = Thermostat.all_for_user(conn.assigns.current_user)

    render(conn, :index, thermostats: thermostats)
  end

  # ...

  def reboot(conn, %{"id" => id}) do
    {:ok, thermostat} =
      id
      |> Thermostat.get!()
      |> Thermostat.reboot()

    conn
    |> put_flash(:info, "Thermostat '#{thermostat.room_name}' rebooted.")
    |> redirect(to: Routes.thermostat_path(conn, :index))
  end
end
We’ll be porting a subset of the functions that are present in the controller module: index/2 and reboot/2. This is mostly to have two somewhat different controller actions to work with.
Let’s first focus on the index/2 function. We could imagine that Thermostat.all_for_user/1 makes a database call of some kind, possibly with Ecto. conn.assigns.current_user would be added to the assigns by the logged_in Plug in the pipeline in the router.
Let’s naively move over the ThermostatController.index/2 logic to the LiveView module, and take it from there:
defmodule HomeAutomationWeb.ThermostatLive do
  use HomeAutomationWeb, :live_view

  alias HomeAutomation.Thermostat

  def mount(_params, _session, socket) do
    thermostats = Thermostat.all_for_user(socket.assigns.current_user)

    {:ok, assign(socket, %{thermostats: thermostats})}
  end

  def render(assigns) do
    ~H"""
    <div id="thermostats">
      <p>Thermostats</p>
    </div>
    """
  end
end
Firstly, we’re inserting the index/2 logic into the mount/3 function of ThermostatLive, meaning that the data will be called for on page load.
Secondly, notice that we changed the argument to Thermostat.all_for_user/1 from conn.assigns.current_user to socket.assigns.current_user. This is just a change of variable name, of course, but it signifies a change in the underlying data structure: you’re not working with a Plug.Conn struct, but rather with a Phoenix.LiveView.Socket.
So far we’ve written some sample template code inside the render/1 function definition, and we haven’t seen the actual templates that would render the thermostats, so let’s get to those.
Creating live templates
Let’s presume that you have a rather simple index page, listing all of your thermostats.
<h1>Listing Thermostats</h1>

<%= for thermostat <- @thermostats do %>
  <div class="thermostat">
    <div class="row">
      <div class="column">
        <ul>
          <li>Room name: <%= thermostat.room_name %></li>
          <li>Temperature: <%= thermostat.temperature %></li>
        </ul>
      </div>

      <div class="column">
        Actions: <%= link("Show", to: Routes.thermostat_path(@conn, :show, thermostat)) %>
        <%= link("Edit", to: Routes.thermostat_path(@conn, :edit, thermostat)) %>
        <%= link("Delete",
          to: Routes.thermostat_path(@conn, :delete, thermostat),
          method: :delete,
          data: [confirm: "Are you sure?"]
        ) %>
      </div>

      <div class="column">
        <%= form_for %{}, Routes.thermostat_path(@conn, :reboot), fn f -> %>
          <%= hidden_input(f, :id, value: thermostat.id) %>
          <%= submit("Reboot", class: "rounded-full") %>
        <% end %>
      </div>
    </div>
  </div>
<% end %>

<%= link("New Thermostat", to: Routes.thermostat_path(@conn, :new)) %>
Each listed thermostat has the standard resource links of Show/Edit/Delete, with a New-link at the very end of the page. The only thing that goes beyond the usual CRUD actions is the form_for, defining a Reboot-button. The Reboot-button will initiate a request to the POST /thermostats/reboot route.
As previously mentioned, we can either move this template code into the ThermostatLive.render/1 function, or we can create a template file named lib/home_automation_web/live/thermostat_live.html.heex. To get used to the new ways of LiveView, let’s put the code into the render/1 function. You can always extract it later (but remember to delete the render/1 function, if you do!).
The first step would be to simply copy paste everything, with the small change that you need to replace every instance of @conn with @socket. Here’s what the ThermostatLive will look like:
defmodule HomeAutomationWeb.ThermostatLive do
  use HomeAutomationWeb, :live_view

  alias HomeAutomation.Thermostat

  def mount(_params, _session, socket) do
    thermostats = Thermostat.all_for_user(socket.assigns.current_user)

    {:ok, assign(socket, %{thermostats: thermostats})}
  end

  def render(assigns) do
    ~H"""
    <h1>Listing Thermostats</h1>

    <%= for thermostat <- @thermostats do %>
      <div class="thermostat">
        <div class="row">
          <div class="column">
            <ul>
              <li>Room name: <%= thermostat.room_name %></li>
              <li>Temperature: <%= thermostat.temperature %></li>
            </ul>
          </div>

          <div class="column">
            Actions: <%= link("Show", to: Routes.thermostat_path(@socket, :show, thermostat)) %>
            <%= link("Edit", to: Routes.thermostat_path(@socket, :edit, thermostat)) %>
            <%= link("Delete",
              to: Routes.thermostat_path(@socket, :delete, thermostat),
              method: :delete,
              data: [confirm: "Are you sure?"]
            ) %>
          </div>

          <div class="column">
            <%= form_for %{}, Routes.thermostat_path(@socket, :reboot), fn f -> %>
              <%= hidden_input(f, :id, value: thermostat.id) %>
              <%= submit("Reboot", class: "rounded-full") %>
            <% end %>
          </div>
        </div>
      </div>
    <% end %>

    <%= link("New Thermostat", to: Routes.thermostat_path(@socket, :new)) %>
    """
  end
end
While this makes the page render, both the links and the form are doing the same “dead” navigation as before, leading to full-page reloads, not to mention that we currently get out from the live page.
To make the page more live, let’s focus on making the clicking of the Reboot-button result in a LiveView event, instead of a regular POST with subsequent redirect.
Changing the button to something live
The Reboot-button is a good target to turn live, as it should just fire an asynchronous event, without redirecting anywhere. Let’s have a look at how the button is currently defined:
<%= form_for %{}, Routes.thermostat_path(@socket, :reboot), fn f -> %>
  <%= hidden_input(f, :id, value: thermostat.id) %>
  <%= submit("Reboot", class: "rounded-full") %>
<% end %>
The reason why the “dead” template used a form_for with a submit is two-fold. Firstly , since the action of rebooting the thermostat is not a navigation action, using an anchor tag (<a>) styled to look like a button would not be appropriate: using a form with a submit button is better, since it indicates that an action will be performed, and the action is clearly defined by the form’s method and action attributes. Secondly , a form allows you to include a CSRF token , which is automatically injected into the resulting <form> with form_for.
Let’s look at what the live version will look like:
<%= link("Reboot",
  to: "#",
  phx_click: "reboot",
  phx_value_id: thermostat.id,
  data: [confirm: "Are you sure?"]
) %>
Let’s break this down a bit:
A note about <form>
First thing to note: this is no longer a <form>!
Above I mentioned CSRF protection being a reason for using the <form>, but the Channel (i.e. the WebSocket connection between server and client) is already protected with a CSRF token, so we can send LiveView events without worrying about this.
The detail above about navigation technically still applies, but in LiveView one would (generally) use a link with to: “#” for most things functioning like a button.
As a minor note: you’ll still be using forms in LiveView for data input, although you’ll be using the <.form> component , instead of calling form_for .
The phx_click event
The second thing to note is that is the phx_click attribute, and it’s value “reboot”. The key is indicating what event should be fired when interacting with the generated <a> tag. The various possible event bindings can be found here:
If you want to have a reference for what events you can work with in LiveView, the link above is a good one to bookmark!
Clarifying a potentially confusing detail: the events listed in the above linked documentation use hyphens (-) as separators in their names. link uses underscores (_), but apart from this, the event names are the same.
The “reboot” string specifies the “name” of the event that is sent to the server. We’ll see the usage of this string in a second.
The value attribute
Finally, let’s talk about the phx_value_id attribute. phx_value_id is special, in that part of the attribute name is user defined. The phx_value_-part of the attribute name indicates to LiveView that the attribute is an “event value”, and what follows after phx_value_ (in our case: id) will be the key name in the resulting “event data map” on the server side. The value of the attribute will become the value in the map.
This means that this…:
phx_value_id: "thermostat_13"
,
…will be received as the following on the server:
%{id: "thermostat_13"}
Further explanation can be found in the documentation:
https://hexdocs.pm/phoenix_live_view/bindings.html#click-events
Adding the corresponding event to the LiveView module
Now that we’ve changed the Reboot-button in the template, we can get to the final step: amending the ThermostatLive module to react to the “reboot” event. We need to add a handle_event function to the module, and we’ll use the logic that we saw earlier in ThermostatController.reboot/2:
defmodule HomeAutomationWeb.ThermostatLive do
  use HomeAutomationWeb, :live_view

  alias HomeAutomation.Thermostat

  def mount(_params, _session, socket) do
    # ...
  end

  def handle_event("reboot", %{"id" => id}, socket) do
    {:ok, thermostat} =
      id
      |> Thermostat.get!()
      |> Thermostat.reboot()

    {:noreply,
      put_flash(
        socket,
        :info,
        "Thermostat '#{thermostat.room_name}' rebooted."
      )}
  end

  def render(assigns) do
    # ...
  end
end
This handle_event function will react to the “reboot” event. The first argument to the function is the event name, the second is any passed data (through phx-value-*), and finally the socket.
A quick note about the :noreply: presume that you’ll be using {:noreply, socket}, as the alternative ({:reply, map, socket}) is rarely useful. Just don’t worry about this, for now.
That’s it!
If you’ve been following this guide, trying to adapt it to your application, then you should have something like the following:
- A live route.
- A live module, where you’ve ported some of the logic from the controller module.
- A template that’s been adapted to be rendered by a live module.
- An element on the page that, when interacted with, causes an event to fire, with no need for a page refresh.
At this stage, one would probably want to address the other CRUD actions, at the very least having their navigation point to the live route, e.g. creating a new thermostat should not result in a redirect to the dead route. Even better would be to have the CRUD actions all be changed to be fully live, requiring no page reloads. However, this is unfortunately outside of the scope of this guide.
I hope that this guide has helped you to take your first steps toward working with LiveView!
Further reading
Here’s some closing advice that you might find useful, if you want to continue on your own.
Exploring generators
A very educative thing to do is comparing what code Phoenix generates for “dead” pages vs. live pages.
Following are the commands for first generating a “dead” CRUD page setup for a context (Devices) and entity (Thermostat), and then one generates the same context and entity, but in a live fashion. The resulting git commits illustrate how the same intent is expressed in the two styles.
$ mix phx.new home_automation --live
$ cd home_automation
$ git init .
$ git add .
$ git commit -m "Initial commit"
$ mix phx.gen.html Devices Thermostat thermostats room_name:string temperature:integer
$ git add .
$ git commit -m "Added Devices context with Thermostat entity"
$ git show
$ mix phx.gen.live Devices Thermostat thermostats room_name:string temperature:integer
$ git add .
$ git commit -m "Added Live version of Devices with Thermostat"
$ git show
Note that when you get to the phx.gen.live step, you’ll have to answer Y to a couple of questions, as you’ll be overwriting some code. Also, you’ll generate a superfluous Ecto migration, which you can ignore.
Study these generated commits, the resulting files, and the difference between the generated approaches, as it helps a lot with understanding how the transition from dead to live is done.
Broadcasting events
You might want your live module to react to specific events in your application. In the case of the thermostat application it could be the change of temperature on any of the thermostats, or the reboot status getting updated asynchronously. In the case of a LiveView chat application, it would be receiving a new message from someone in the conversation.
A very commonly used method for generating and listening to events is making use of Phoenix.PubSub . Not only is Phoenix.PubSub a robust solution for broadcasting events, it gets pulled in as a dependency to Phoenix, so you should already have the hex installed.
There are numerous guides out there for how to make use of Phoenix.PubSub, but a good place to start is probably watching how Chris McCord uses LiveView and Phoenix.PubSub to create a Twitter clone, in about 15 minutes (the part with Phoenix.PubSub is about half-way through the video).
HTTP verbs
Regarding HTTP verbs, coming from the world of dead routes, you might be wondering:
I’ve got various GET/POST/PUT/etc. routes that serve different purposes. When building live modules, do all of the routes (with their different HTTP verbs) just get replaced with live?
Yes, mostly. Generally your live parts of the application will handle their communication over the WebSocket connection, sending various events. This means that any kind of meaning you wish to communicate through the various HTTP verbs will instead be communicated through various events instead.
With that said, you may still have parts of your application that will still be accessed with regular HTTP requests, which would be a reason to keep these routes around. The will not, however, be called from your live components.
Credits
Last year, Stone Filipczak wrote an excellent guide on the SmartLogic blog , on how to quickly introduce LiveView to an existing phoenix app. It was difficult to not have overlap with that guide, so my intention has been to complement it. Either way, I encourage you to check it out!
The post You’ve been curious about LiveView, but you haven’t gotten into it appeared first on Erlang Solutions .