A walkthrough of how we implemented GoFish as a way of learning Elixir and the concepts of the BEAM and OTP.
Intro
In this article, we will outline our initial design and implementation of the card game Go Fish in Elixir using raw processes, and then describe how we were motivated to re-implement the project using the GenServer module instead. The first step is to agree upon the rules of the game, then describe the domain model and non-functional requirements, and from these we can design the solution using sequence diagrams for various scenarios.
Based on this design, we then implement it in code. We are using Test Driven Development, meaning we start by writing a failing test and then make it pass by implementing the code for it. This approach reduces debugging times and encourages clean and simple code solutions.
It’s important to note that, while this blog post is presented in a logical order, in reality, we arrived at the eventual solution iteratively. For example, several sequence diagrams have been discarded to reach the ones we present here.
Go Fish rules
These are the rules we will follow. This description takes basis in the description on
Wikipedia
.
Five cards are dealt from a standard 52-card deck to each player, or seven cards if there are only two players. The remaining cards are shared between the players, usually spread out in a disorderly pile referred to as the “ocean.”
The player whose turn it is to play asks another player for their cards of a particular face value. For example, Alice may ask, “Bob, do you have any threes?” Alice must have at least one card of the number she is requesting. Bob must give Alice all cards of that number in his hand. If he has none, Bob tells Alice to “go fish,” and Alice draws a card from the “ocean” and places it in her own hand. Then it is Bob’s turn, since the turn switches to the person saying “go fish.” When any player at any time has four cards of one face value, it forms a book, and the cards must be placed face up in front of that player. When all sets of cards have been laid down in books, the game ends. The player with the most books wins.
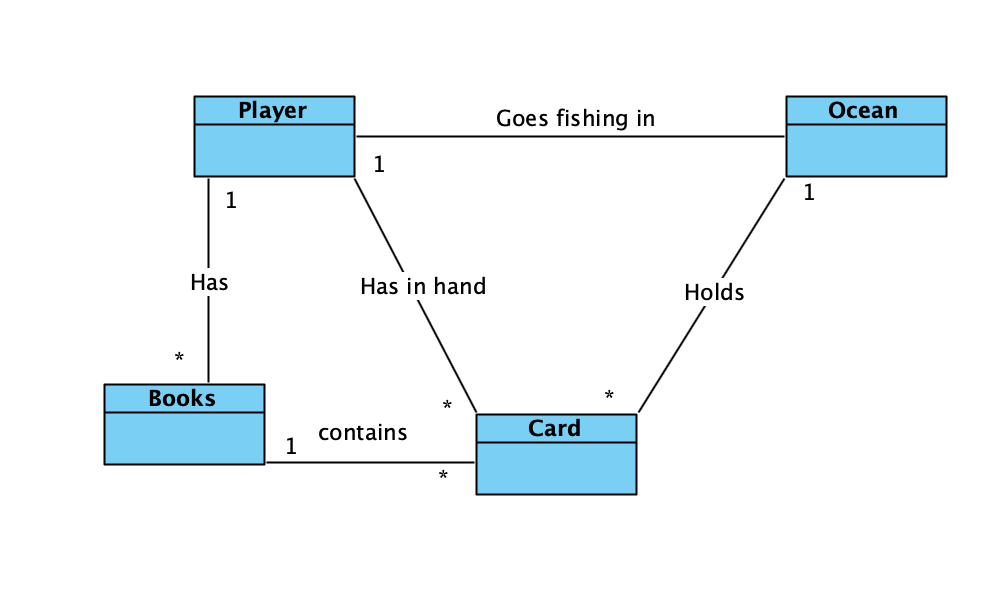
Domain
An overview is shown in the domain diagram below.
-
The Ocean initially holds all the cards in the deck.
-
When a Player collect Cards from the Ocean this is called “going fishing”.
-
A Book is formed by 4 cards of the same value.
Objectives
We need to make a playable version of the Go Fish game. This implies the following functional requirements:
-
A player can join a game.
-
A player can ask another player for cards of a specific value so that they can collect cards from that player’s hand, or else go fishing.
-
A player can draw cards from the ocean.
-
A player can form books out of four cards of the same value in their hand.
-
Once all books have been collected, a winner will be determined.
-
Non-functional requirements
-
The game should be playable by calling the external API for each process in the BEAM.
-
Another process must call the external API of other processes and cannot send messages directly to the process.
Design
First of all, we need a process for the Ocean that can hold cards. Other processes should be able to draw cards from that Ocean.
Then we need a process for each Player, each player has a set of books and cards.
We will have a Controller, which will keep track of the players that are in the game, whether the game is over, and who won the game.
Before we start coding, we draw sequence diagrams to determine what messages are sent throughout a game. Our initial design wasn’t perfect, and we had to go back and update the sequence diagrams when we realized that certain things needed to change. For example, initially, we had planned to implement a fully-distributed approach, with only the Player and Ocean entities, however, this turned out to over-complicate the process of determining when the game is over and who had won. So in the end we added a Controller to keep track of this. This resulted in the following sequence diagram (illustrating a two-player game).
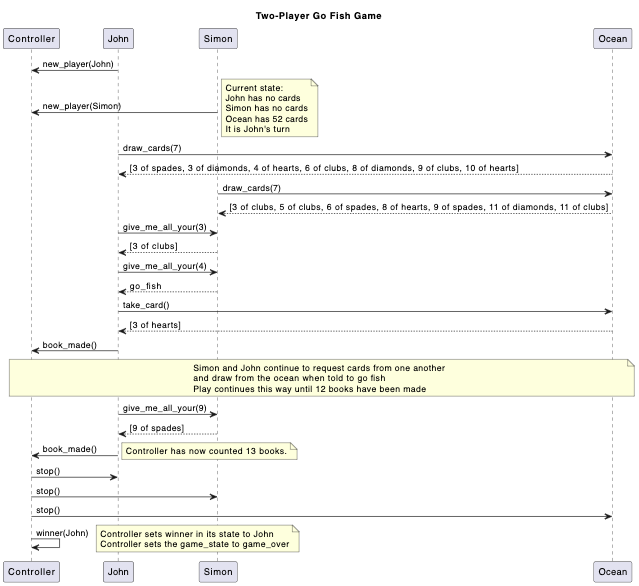
This diagram describes the game start-up, where new players (John and Simon) first register their names with the Controller. Both players draw 7 cards from the Ocean. Games with 3 or more players draw 5 cards each. Gameplay can now begin with the first player (John) requesting any 3s from the second player (Simon). John receives a card from Simon, and so his turn continues. His second request, for 4s however, is met with a “go fish,” as Simon does not have any 4s. The turn has now passed to Simon; however, John must first take a card from the Ocean. He receives a 3 of hearts, which completes his “book” of 3s. He then sends a message to the Controller that a new book has been made.
Play continues in this way until the Controller has counted that 12 books have been made. When the 13th book is made, the Controller sends stop messages to each player and the Ocean, and calculates the winner, based on the player with the most books.
From raw processes to GenServer
Processes can
send
and
receive
messages. They act depending on the message received. We can see that in the initial implementation of the Player process. To maintain the state within this process, we pass the state as a parameter to the recursive call. In this case, the state consists of a hand of cards.
defmodule GoFish.Player do
  defp loop(hand) do
    IO.puts(["Player has the hand: ",hand])
    receive
      :go_fish ->
        GoFish.Ocean.draw_card(self())
        loop(hand)
      {:cards, cards} ->
        loop(cards ++ hand)
      {:give_me_all_your, taker, asking_value} ->
        #TODO ...
  end
end
As you can see, the
receive
loop will quickly grow for every message we need to receive. We will also have to come up with
receive
messages for every synchronous call. Finally if one of the processes in the game fails, we currently have no mechanism for recovering the game. The solution to these issues is to use GenServer.
One immediate benefit of GenServer its easy implementation. This is partly due to the concise introduction in the documentation that includes clear examples to get started using it. As documentation can sometimes be a little difficult to follow, this was a real help.
GenServer abstracts away the
loop
function and allows us to organise what happens on each
receive
message into functions, eliminating some boilerplate code and improving readability.
GenServer makes it easier to send synchronous messages (
call
), since we don’t need to implement the receive call for getting a response back from
send
message.
GenServer can be organised into a supervision tree, which makes it possible to monitor all processes in the game and restart them once one of the processes dies using a recovery strategy. For Go Fish we used the “all for one” supervision strategy, meaning that once the supervisor detects that a child process has died, it will restart every other child process. We chose this strategy because if the player or ocean process dies, the entire game will need to be restarted.
Testing
As indicated previously, we used Test Driven Development (TDD) approach. We sought to first and foremost test individual functions isolated from their use in processes. Then we added tests for processes for which there are certain quirks. However there were some hiccups along the way.
We found that using
spawn
or
start_link
for a named process would cause the error that a process with the same name had already been registered. This was because the processes weren’t terminated at the end of each test. Later we found that this could be resolved by using the
start_supervised
function instead, which would take care of starting and terminating the processes for each test.
But then we inserted it into the
ExUnit.setup_all
block, which we mistakingly thought would be executed before every test, but then we found that we needed to use
ExUnit.setup
for that. We found the naming to be unintuitive, which again shows that naming things is one of the hardest problems in computer science.
TDD made it clear what the intended functionality was and allowed us to focus merely on that feature without getting distracted by other things that could be improved. For these, we simply wrote a
#TODO
comment such that we could revisit it later.
Discussion & Conclusion
Implementing a game as the first introduction to a language is a great way to get started. It allowed us to focus all our energy on the new concepts and syntax since the specification for the game was very clear and relatable. Go Fish was a good fit for learning BEAM since it naturally mapped to multiple processes that communicate with each other.
Pair programming was very helpful in getting through challenging problems and for sharing editor workflows and shortcuts with each other. A future blog post may go into depth on pair-programing in a remote setting.
References
Go Fish – Wikipedia
GenServer – Docs
ExUnit – Docs
Our Go Fish implementation – GitHub
Thanks
to the following great people for reading drafts and providing comments on this:
Tee Teoh – Erlang/Elixir Architect
Torben Hoffmann – VP of ESL London
Alex Koutmos – Author –
Twitter
The post
Implementing Go Fish to Learn Elixir
appeared first on
Erlang Solutions
.