-
Pl
chevron_right
Erlang Solutions: Everything you need to know about Phoenix Framework 1.7
news.movim.eu / PlanetJabber • 13 October 2022 • 7 minutes
It is an exciting time for the Elixir community. As you may have seen at ElixirConf or ElixirConf EU, we are celebrating the 10th anniversary of Elixir . Despite now being 10 years old, there is no slowdown in the number of exciting new features, frameworks, and improvements being made to the language.
One of the most exciting developments for Elixir is undoubtedly Phoenix . It is a project that is growing in both features and uses cases at an incredible pace. Phoenix 1.5 included some huge changes including the addition of LiveView to the framework, the creation of LiveDashboard, and the new version of PubSub (2.0.).
Next Phoenix 1.6 introduced even more exciting features, most notably the HEEx engine, the authentication and mailer generators, better integration with LiveView, and the removal of node and webpack, which was replaced with a more simplified esbuild tool.
For many of us, each new Phoenix framework release brings back the feeling of being a kid on Christmas, we wait with eager anticipation for Chris McCord to announce the new toys we have to play with for the upcoming year, but with these new toys also comes a challenge for those who want to keep their skills and their systems up-to-date. The migration nightmare. We will revisit that at the end of this post.
Roadmap
Since Phoenix 1.5 it is a noticeable trend to move into LiveView, as we progress, LiveView can replace more and more JavaScript code, allowing the Elixir developer to get better control of the HTML generation. In the latest release, this trend is continued with the following new features:
- Verified Routes. This gives us the ability to define paths using a sigil that checks compilation time compared to defined routes.
- Tailwind. In addition to answering our prayers concerning JavaScript and HTML, this new version also helps manage CSS.
- Component-based generators. These features offer us a new and better way to write components.
- Authentication generation code using LiveView. This lets us generate the code for the authentication code but using LiveView instead of the normal controllers, views, and templates.
We will go deeper into each of these features, but you can already see a trend, right? We are moving more and more to LiveView in the same way we are removing the need to manage things like HTML, JavaScript, and CSS.
First, let’s look more at LiveView specifically, for release 0.18, Chris McCord announced these improvements:
- Declarative assigns/slots – which let us define information about attributes and slots which are included inside of the components.
- HTML Formatter – which performs the format (mix format) for HEEx code even if it’s included inside of the sigil ~H.
- Accessibility building blocks.
Now let’s look at each of these elements in deeper detail.
Verified Routes
The story is that Jason Stiebs (from the Phoenix team) has been requesting a better, less verbose way, to use the routes for the last 8 years. The 12th time he requested it Chris McCord agreed to this feedback and José Valim had a fantastic way to make that happen.
The basic idea is that if we have this:
This is generating the route which we could use in this way:
This is very verbose, but it could be even worse if we have a definition of the routes nested like this one:
And it is just as verbose when we use LiveView:
To avoid this, the Verified Routes provides us a shortcut using the path:
As you can see, using the sigil “~p” we can define the path where we want to go and it’s completely equivalent to using the previous Routes helper function.
The main advantage of this feature is that it allows us to write the path concisely and still check if that route is valid or not in the same way we would use the Route Helper function.
Tailwind
To understand this change let’s look at what Adam Wathan (creator of Tailwind) said about CSS and the use of CSS:
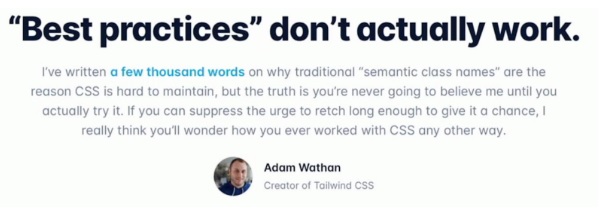
The use of CSS in a traditional way, that is using “semantic class names”, is hard to maintain and that’s why he created Tailwind. Tailwind is based on the specification of how the element should be shown. There can be different elements that are semantically the same, for example, two “Accept” buttons where we want one to appear big and the other a bit narrower. Under this paradigm, we’d be forced to use the class “accept-button” in addition to the classes which are modifying this case and which do not allow them to be reused.
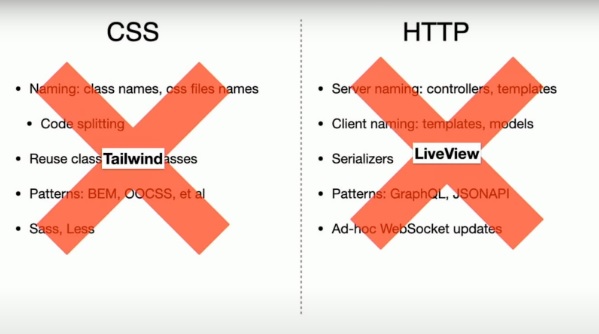
The other approach is to implement small modifications to how we present the buttons. In this way, we can define a lot in HTML and get rid of the CSS.
The main idea, as I said previously, is to replace as much CSS as possible in the same way as LiveView replaced a lot of JavaScript:
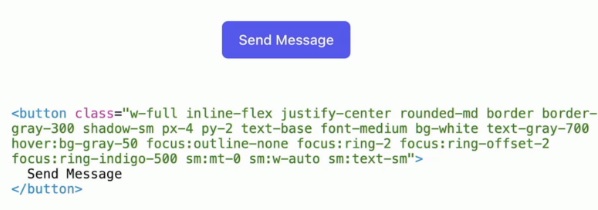
For example, using Tailwind with HTML and getting rid of CSS, we could build a button like this one with the code shown in the image below:
It could be argued that it’s complex, but it’s indeed perfect from the point of view of LiveView and components because these classes can be encapsulated inside of the component and we can use it in this way:

And finally, in the template:

Easy, right?
Authentication generation code using LiveView
Big thank you to Berenice Medel on the Phoenix team, she had the great idea to have the generation of the authentication templates work with LiveView.
Declarative Assigns / Slots
Before going into this section, Chris McCord gave a big thank you to Marius Saraiva and Connor Lay. They are the people in charge of all of the improvements regarding declarative assigns, slots, and HEEx.
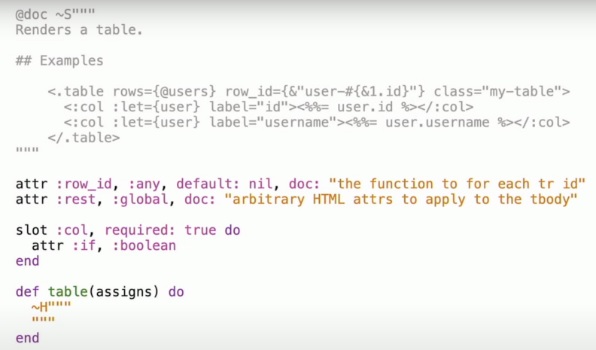
The idea behind slots and attrs is to provide us with a way to define attributes and sub-elements inside of a defined component. The example above, it’s defining a component with the name “table”. It’s defining the attributes “row_id” and “rest”, as you can see in the documentation, the attributes for the table are “rows”, “row_id”, and “class”. That means we can find “row_id”, then “rest” will feature a map with all of the remaining attributes.
As we said, the slot is a way to indicate we are going to use a sub-element “col” inside of the “table”. In the example, you can see two elements “col” inside of “table”. The “col” element has only defined one attribute “if” which is a boolean.
HTML Formatter
A big thank you to Felipe Renan who worked on the implementation of this for HEEx to be included in Phoenix. Now, it’s possible to have a “mix format” fixing the format of the code written inside of the templates, even inside of the ~H sigil.
Accessibility building blocks
Phoenix 1.7 includes some primitives for helping to create more accessible websites. One of them is “focus_wrap”:
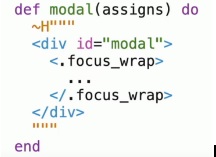
This helps define the areas where you want to shift focus between multiple elements inside of a defined area instead of a whole website.
This works in combination with functions in the JS module which configure the focus like a stack. When you go into the modal it pushes the focus area that we use and when the modal is closed, we pop out from that area of the stack and stay with the previous one.
More improvements in the Roadmap
One of the improvements for LiveView is Storybook. Storybook is a visual UI creator which lets us define the components we want to be included in our websites and then generate the code to be implemented for it. Christian Blavier did great work starting this in his repository but he’s now off and the Phoenix team is going to be moving it forward and evolving it.
Streaming data for optimized handling of collections data is another priority in the roadmap. The work for this has already started, fingers are crossed that it might be announced for the next release.
During recent conferences, another speaker raised a concern about the messaging incompatibility between LiveView and LiveComponent, luckily, this is on the roadmap to be fixed shortly.
And is that all?
With all the developments in Phoenix, it would be easy to talk about at much greater length and in much greater detail. The pace of the Phoenix team’s progress is impressive and exciting.
As it continues to grow it is easy to imagine a future where we only need to write HEEx code inside of Elixir to get full control of generated HTML, CSS, and JavaScript for the browser. It’s exciting to imagine and will be sure to further grow the use and adoption of Elixir as a full-stack technology.
Read to adopt Elixir? Or need help with your implementation? Or contact us about our training options.
The post Everything you need to know about Phoenix Framework 1.7 appeared first on Erlang Solutions .